Getting started
First glance into GSI Crawler
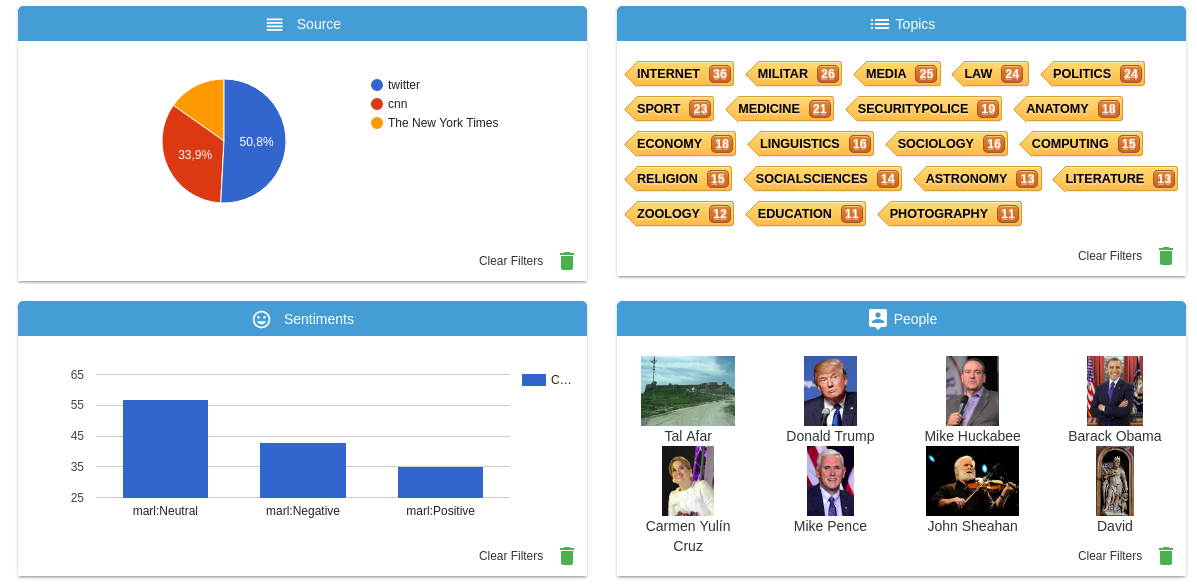
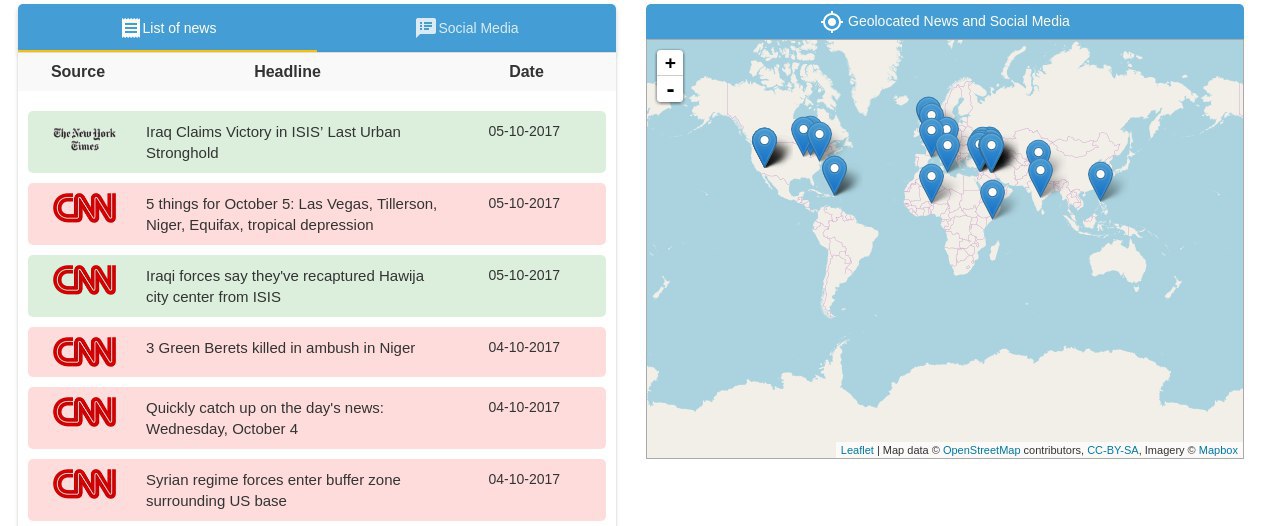
The quickest way of exploring the possibilities offered by GSI Crawler is accessing this demo. There you can find a dashboard to visualize data collected from different News sources and Twitter. Some examples of added value offered by this tool are topic and sentiment extraction, identification of people appearing on the scraped data and geolocation of sources.
Tutorial I: Install
GSI Crawler installation is based in docker containers, so it is required to have both docker and docker-compose installed.
For docker installation in Ubuntu, visit this link.
Docker-compose installation detailed instructions are available here.
First of all, you need to clone the repositories:
$ git clone http://lab.cluster.gsi.dit.upm.es/sefarad/gsicrawler.git
Then, it is needed to set up the environment variables. For this task, first create a file named .env in the root directory of each project (gsicrawler and dashboard-gsicrawler). As you can see, Twitter and Meaningcloud credentials are needed if you wish to use those services.
TWITTER_CONSUMER_KEY={YourConsumerKey, get it on Twitter}
TWITTER_CONSUMER_SECRET={YourConsumerSecret, get it on Twitter}
TWITTER_ACCESS_TOKEN={YourAccessToken, get it on Twitter}
TWITTER_ACCESS_TOKEN_SECRET={YourAccessTokenSecret, get it on Twitter}
ES_ENDPOINT=elasticsearch
ES_PORT=9200
ES_ENDPOINT_EXTERNAL=localhost:19200
FUSEKI_PASSWORD={YourFusekiPass}
FUSEKI_ENDPOINT_EXTERNAL=localhost:13030
FUSEKI_ENDPOINT={YourFusekiEndPoint}
API_KEY_MEANING_CLOUD={YourMeaningCloudApiKey, get it on Meaningcloud}
FUSEKI_ENDPOINT = fuseki
FUSEKI_PORT = 3030
Finally, execute the following lines:
$ cd gsicrawler
$ sudo docker-compose up
The information related to the initialization can be found in the console. If you wish to see how tasks are being executed, apart from seeing the logs you can access the Luigi task visualizer in localhost:8082. In the next steps you will discover more about Luigi.
When the process finishes it is possible to access the Demo dashboard by accesing localhost:8080 from your web browser.
Tutorial II: Crawling news
This second tutorial will show how to build a crawler to gather news from the CNN extracting data from the CNN News API, but in a general case we could use Scrapy library, which allows to extract data from web pages.
We will only obtain the headline and url of each piece of news appearing on the CNN related to one topic, storing those fields into a JSON file.
The code of this example can be found in luigi/scrapers/tutorial2.py:
import requests
import json

def retrieveCnnNews(search, num, filepath):
  r = requests.get("https://search.api.cnn.io/content?q=" + search + "&size=" + str(num) + "")

  response = r.json()["result"]

  with open(filepath, 'a') as outfile:
    print("CRAWLING RESULT")
    for newsitem in response:
      aux = dict()
      aux["url"] = newsitem["url"]
      aux["headline"] = newsitem["headline"]
      print(aux)
      json.dump(aux, outfile)
      outfile.write('\n')
Then, we have to program a Luigi task which orders to execute the code from above. For more information about Luigi pipelines of tasks, please visit this documentation. This task will appear in luigi/tutorialtask.py.
class CrawlerTask(luigi.Task):
    """
    Generates a local file containing 5 elements of data in JSON format.
    """
    url = luigi.Parameter()
    id = luigi.Parameter()

    def run(self):
        """
        Writes data in JSON format into the task's output target.
        """
        filePath = '/tmp/_scrapy-%s.json' % self.id
        print(self.url, filePath)
        retrieveCnnNews(self.url, 10, filePath)

    def output(self):
        """
        Returns the target output for this task.
        In this case, a successful execution of this task will create a file on the local filesystem.
        """
        return luigi.LocalTarget(path='/tmp/_scrapy-%s.json' % self.id)
Finally, for running the tutorial execute the following line from your repository path.
$ sudo docker-compose run gsicrawler tutorial2
The resulting JSON will appear on the console.
{"headline": "Iraqi forces say they've recaptured Hawija city center from ISIS", "url": "http://www.cnn.com/2017/10/05/middleeast/iraq-isis-hawija/index.html"}
{"headline": "3 US troops killed in ambush in Niger", "url": "http://www.cnn.com/2017/10/04/politics/us-forces-hostile-fire-niger/index.html"}
Tutorial III: Semantic enrichment and data storage
In this tutorial we are going to structure our data according to the NewsArticle entity from Schema. The scraper code can be found in luigi/scrapers/tutorial3.py.
import requests
import json

def retrieveCnnNews(search, num, filepath):
  r = requests.get("https://search.api.cnn.io/content?q=" + search + "&size=" + str(num) + "")
  response = r.json()["result"]

  with open(filepath, 'a') as outfile:
    for newsitem in response:
      aux = dict()
      aux["@type"] = "schema:NewsArticle"
      aux["@id"] = newsitem["url"]
      aux["_id"] = newsitem["url"]
      aux["schema:datePublished"] = newsitem["firstPublishDate"]
      aux["schema:dateModified"] = newsitem["lastModifiedDate"]
      aux["schema:articleBody"] = newsitem["body"]
      aux["schema:about"] = newsitem["topics"]
      aux["schema:author"] = newsitem["source"]
      aux["schema:headline"] = newsitem["headline"]
      aux["schema:search"] = search
      aux["schema:thumbnailUrl"] = newsitem["thumbnail"]
      json.dump(aux, outfile)
      outfile.write('\n')
The Luigi pipeline has more complexity as now data has to be stored in Elastic Search and Fuseki. The code of the pipeline can also be found in luigi/scrapers/tutorial3.py, being the task execution workflow initiated by PipelineTask, which is in charge of calling its dependent tasks.
For executing this tutorial you should execute the following line:
$ sudo docker-compose run gsicrawler tutorial3
In order to access the stored data in Elastic Search, access localhost:19200/tutorial/_search?pretty from your web browser.
{
  "_index" : "tutorial",
  "_type" : "news",
  "_id" : "http://www.cnn.com/2017/10/04/politics/syria-russia-us-assad-at-tanf/index.html",
  "_score" : 1.0,
  "_source" : {
    "@type" : "schema:NewsArticle",
    "@id" : "http://www.cnn.com/2017/10/04/politics/syria-russia-us-assad-at-tanf/index.html",
    "schema:datePublished" : "2017-10-04T18:05:30Z",
    "schema:dateModified" : "2017-10-04T18:05:29Z",
    "schema:articleBody" : "Forces aligned with Syrian President Bashar al-Assad made an incursion Wednesday into the 55km \"de-confliction zone..." ",
    "schema:about" : [
      "Syria conflict",
      "Armed forces",
      "ISIS",
      "Military operations"
    ],
    "schema:author" : "cnn",
    "schema:headline" : "Syrian regime forces enter buffer zone surrounding US base",
    "schema:search" : "\"isis\"",
    "schema:thumbnailUrl" : "http://i2.cdn.turner.com/cnnnext/dam/assets/170616041647-baghdadi-file-story-body.jpg"
  }
In the case of seeing it on Fuseki, the address would be localhost:13030/tutorial/data.
<http://www.cnn.com/2017/10/02/politics/las-vegas-domestic-terrorism/index.html>
        a                     schema:NewsArticle ;
        <http://latest.senpy.cluster.gsi.dit.upm.es/ns/_id>
                "http://www.cnn.com/2017/10/02/politics/las-vegas-domestic-terrorism/index.html" ;
        schema:about          "Shootings" , "Mass murder" , "Las Vegas" , "2017 Las Vegas concert shooting" ;
        schema:articleBody    "President Donald Trump on Tuesday did not say ...\"" ;
        schema:author         "cnn" ;
        schema:dateModified   "2017-10-03T14:13:36Z" ;
        schema:datePublished  "2017-10-02T21:26:26Z" ;
        schema:headline       "Trump mum on whether Las Vegas shooting was domestic terrorism" ;
        schema:search         "\"isis\"" ;
        schema:thumbnailUrl   "http://i2.cdn.turner.com/cnnnext/dam/assets/171002123455-31-las-vegas-incident-1002-story-body.jpg" .
Tutorial IV: Developing your first dashboard
In this section we will explain how to create a new dashboard for GSICrawler.
We have create the main structure inside demodashboard folder. Open a web browser and visit localhost:8090 to explore this new dashboard.
As you can see there is a google-chart displaying how many news are created each day. To add new web components to your dashboard you have to edit dashboard-gsicrawler.html file inside demodashboard folder.
Search the line that says
<!— YOUR NEW COMPONENTS GOES HERE —>
Below this line we are going to add a new web component, in this tutorial we are going to add a number-chart adding:
<number-chart></number-chart>
Refresh your web browser and you will see your new number-chart component, but with no data. To add your data change the line added before:
<number-chart data="{{data}}"></number-chart>
Refresh your web browser again to see your data. As you can see it has a place for an icon, we can add it typing:
<number-chart data="{{data}}" icon="/images/news.ico"></nomber-chart>
This icon must be stored inside images folder. Refresh your web browser to see your changes.
This web components has many more options like changing the background color, the title… For more information visit https://lab.cluster.gsi.dit.upm.es/sefarad/number-chart.
You can add as Web Components as you want, there are some examples in https://github.com/PolymerElements/
If you wish to discover more about how to create dashboards, please visit Sefarad documentation.
